
DevOps Pipeline with Microsoft Azure Services
By Thomas Suebwicha
Written July 20, 2020
Last Edited December 11, 2020
This guide will inform you on how to create a DevOps pipeline in Microsoft Azure DevOps. I’ve used an example maven project to demonstrate it.
Requirements
- Microsoft Azure Account with Credit
- A GitHub Repository with the a maven spring project
- Docker Hub Repository
QuickStart video on how to create a CI/CD Pipeline in Azure Video
Setup
Navigate to “Create a resource” > DevOps > DevOps Starter. Here you will be able to create your first DevOps Starter. Click on “Quick starts + tutorials” for documentation.

DevOps Starter will direct you to their quick start setup. Follow the prompts selecting the appropriate components that suits your project. For this example an external repository will be used so select “Bring your own code”.
NOTE: Selecting other options will as a result create a new Azure Repository

Select your Code Repository > GitHub. Permission is required for that project to enable a webhook and access to it. After giving access, select specific “Repository” and “Branch”.

Next step is information about the application or framework you use to use it on. For a conventional CI/CD Pipeline, it would be dockerised so toggle to “Yes”.

This application could be the complete CI/CD by deploying to a Kubernetes Service but for simplicity, select Web App for Container”. Specify the Dockerfile path in the sidebar.

In the last step, can specify the project related details.

The sidebar can be accessed by additional settings. Ensure that the locations are set to your region to have a higher connection. Once finalised all the settings, click Done!
Now wait as the resources are provisioned for your DevOps project.
Once confirmation of deployment, go to the homepage by clicking on “Go to resource”.
You should see something like this.

Click on “Project homepage” as this is only the DevOps Starter Overview. Project homepage will allow you to visualise your workspace for the DevOps operations. You should see the following as the Project homepage.

There is a lot of depth that can be explored here but a few features to outline.
- Dashboards — Is your metrics of your pipeline where you can have widgets such as “build history”, charts relating to performance and testing. Their full widget features are at the marketplace.
- Wiki — All in one place documentation regarding the project or documentation for the DevOps pipeline.
- Boards — Have a mixture of Work items that have a feature of putting down the following types

And can additionally be put in a visual representation (scrum or kanban boards)
- Pipelines — Essentially CI/CD Pipeline with a nicer interface. It has a big suite of tools through the market place. Each build step can alternatively be seen as a YAML format. Key plugins are Jenkins Server access, SonarQube server access, Docker build & push, Kubectl deployment option. More pipeline “tasks” can be found on the marketplace. A working pipeline will be discussed later on.
- Artifacts — This is an easy way of sharing resources and libraries to colleagues throw the dependency system.
Pipeline
To create a useful pipeline, what will be created is a CI/CD pipeline that has one agent that compiles and packages a spring project. It will be then deployed to Docker Hub repository where it will can be deployed to a Kubernetes cluster.
To access the pipeline go to Pipelines > Select Pipeline > Edit.
The default pipeline will likely look similar to this.

Currently the pipeline will get the source code from the GitHub repository and has a single agent(and could have more) building the image and deploying it to Azure Container.
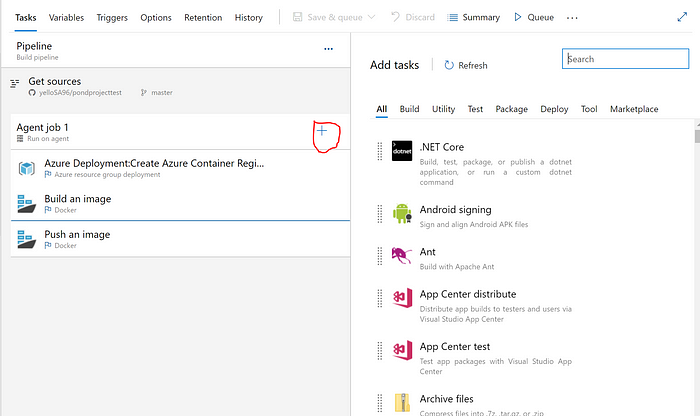
This will give you all the task options. From here, need to add a few steps.
Remove the two docker steps as it will be replaced.
Locate the following plugins and add them, they will be configured and ordered afterwards.
- Maven
- Kubectl(deploy)
- Docker (this has the step ability to build push in one)
Once added the tasks. Order as the following.

Let’s configure each step.
Maven

Here are a few parameters to specify. The pom file and it’s location in respective the source code. The other is the goal. This relates to the maven lifecycle and which stage you want to achieve. It can be read up here.
Docker (Build, Login and Push)

In this step, you will want to configure Container registry. By default you will be using their Azure Container registry which is not what we want. Alternatively, we can point it to the DockerHub public repository. All that needs to be specified is the <username>/<repository_name>. In this example pointing to my own repository as seen above or at this link here. Other things to note is the Dockerfile location, I’ve specified in a folder otherwise if in root then I believe “Dockerfile” should be fine too.

It is best practise to keep your account (username & password) safe and to do this, creating a personal access token with limited rights allows you to maintain it. So if we go to your DockerHub account, you may create an personal access token in Account Setting > Security > New Access Token. Once created, paste it as your “Docker Password”.
Kubectl
To complete the pipeline, a continuous deployment step is required. This example will deploy to Kubernetes cluster. The command needed is the image set. the command format is as follows. (It will be also shown in a screenshot)
$ kubectl set image deployment/<DEPLOYMENT_NAME> <CONTAINER_NAME>=<DOCKERHUB_REPO>/<TAG BUILD>After adding it, updated the settings as follows. Since the kubernetes cluster is on the same account, a Kubernetes cluster connection can be setup.

$(Build.BuildId) is a predefined variable used in the pipeline. As indicated it is a build id of this run.
After modifying everything. Run pipeline to validate its execution. Click on the Agent in jobs section to see in execution. It should look like the following after execution.

That’s it! You’ve made your azure pipeline linked to your github account.
Cost
As a cloud service, there are associated costs. Generally open source tools require a platform to operate from and have operational costs that associated with it requiring you do the configuration. As a service their costing is based on users. Last checked on 21.07.2020, the pricing for a basic plan providing majority of the features in this article is free up to the first 5 users or open source project. Benefitting small teams. After the 5 it is approximately $8-$9 per user per month.
References
[C] Securing DevOps